Customer Paul writes:
I was wondering if there is a way to cure my frying pans. The food.I cook seems to stick too easy no matter if I use oil or butter in the pan.
Customer Paul writes:
I was wondering if there is a way to cure my frying pans. The food.I cook seems to stick too easy no matter if I use oil or butter in the pan.
If you’ve read just about anything on our site, you likely know that the quality of today’s Revere Ware pales in comparison to that made in the pre-1968 era. We’ve heard lots of stories of quality issues like the copper bottom falling off. But let’s say you don’t care about the quality and just want a set of Revere Ware cookware because you like the look. Is it cheaper to get a new set, or a used set from eBay.
Here is a new set on Amazon.com.
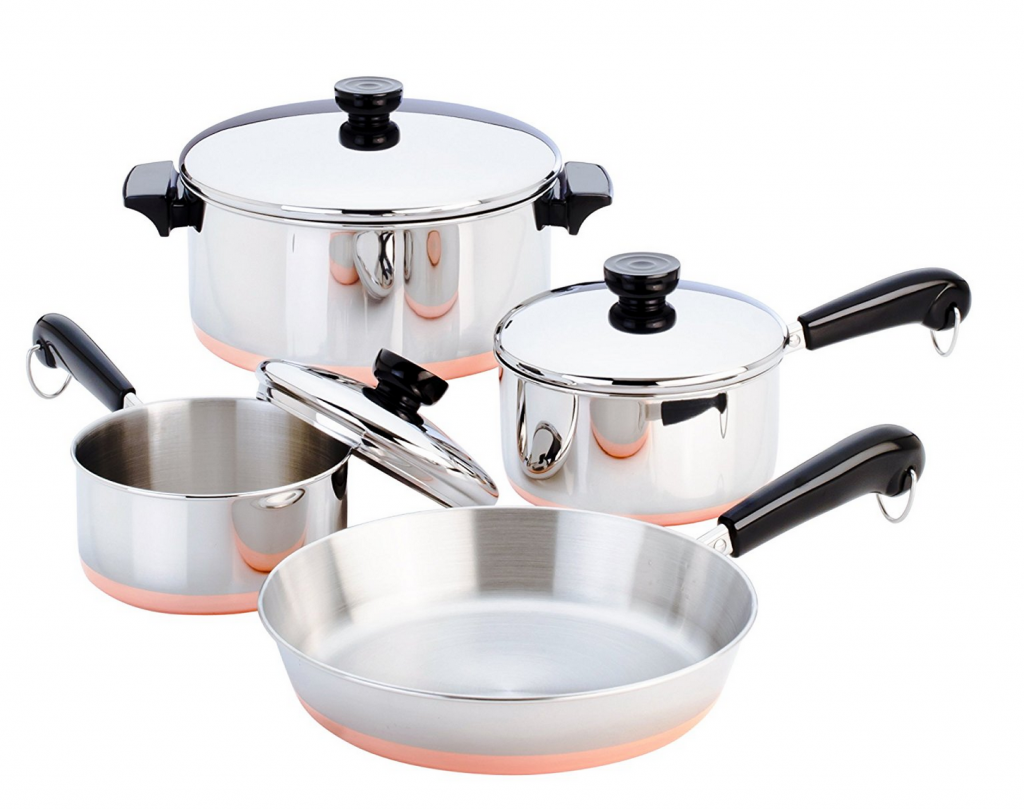
This set costs $95.55 with free Amazon Prime shipping an option if you are a Prime member.
Here is what we put together from eBay:
4.5 quart Dutch oven with lid: $33 shipped
9″ skillet with lid: $31 shipped
1.5 quart sauce pan with lid: $$20 shipped
1 quart sauce pan with lid: $20 shipped
That gives us a total of $104 shipped. Withe the tax you’ll likely pay on Amazon.com, and the potential to find better deals on eBay (there are lot of Revere Ware pieces listed at any given time) we’ll call the costs roughly even.
If you wanted to replace all the handles and knobs, that would run you about another $50, although all the items we found on eBay had Bakelite handles and knobs that were in reasonable condition.
If you scoured your local thrift stores, you could likely find all the vintage Revere Ware items for much cheaper, but there is a time cost involved.
It seems to come down to preference – buy a set that will last a few years before it starts falling apart, or buy as set that will likely last many more decades and has a strong history to it.
We sell two different sauce pan and skillet handles.
Single screw style
The single screw handle was made post 1968. It has a single screw, or, more likely, rivet through the metal part of the handle that holds the handle to the pot. Any size of these handles will fit any pot, so you really can’t go wrong unless you put a small handle on a very large pot or vice versa. The best wy to size this handle is just to measure the overall length of the Bakelite part of the handle.
5.4 in long Bakelite – X-Large
4.8 in long – Large
4.3 in long – Medium
4.1 in long – Small
Two-screw style
These were made before 1968 and have a screw at either end of the handle. Note that very early ones has two screws near the front, and another around the hanging hook in the back. If you have one of those, there is no exact replacement.
There are two ways to size these up. The easiest way is to start with the spline height.
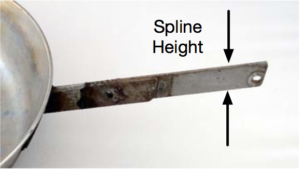
3/8 in – Small
5/8 in – Medium
3/4 in -Large or X-Large
If you have a 3/4 in spline, then check the distance between the centers of the holes to determine which handle you have. Alternately, you can just start with that measurement.
In our kitchen, we have a great fondness for our cast iron pan, which has been nicely seasoned for years. It holds a permanent spot on our stove top and gets used almost every day. Most of the time, I simply scrape the bottom with a metal spatula and wipe it out with a paper towel. About every third time I cook, I also add a little water and scrub it with a nylon brush (but no soap). It stays nicely seasoned and food, for the most part, doesn’t stick.
I recently found a video that shows how to season a stainless steel pan to make it nonstick, and it it pretty simple.
I am going to try this with out of our Revere Ware skillets and report back.
This seems almost too good to be true, that simply adding adding a dryer sheet to a soak for burnt on food will magically soften it. I’m afraid my wife hasn’t been burning too much food lately so I am at a disadvantage for being able to test this. If someone has a chance to test this, it would be interesting to try it with soap along and with soap and the dryer sheet.
We found this great video on using and caring for your stove top percolator.
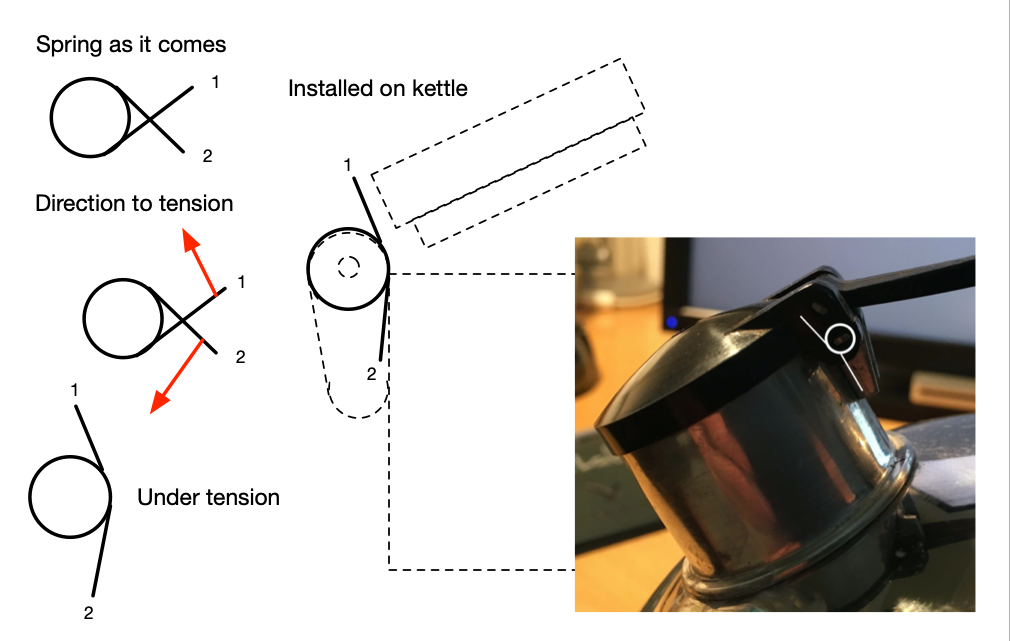
A few customers have had difficulty installing the spring when replacing the tea kettle cap and trigger. To help, we created this handy graphic that shows the orientation o the spring and how to tension it. You can also find the full installation instructions and our cleaning tips on the Tea Kettle page.
We sell quite a few of the Revere Ware vintage pressure cooker gaskets.
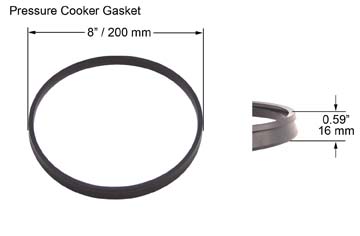
Occasionally, we get complaints that the gaskets don’t seal properly. Here is a checklist of things to try before you consider returning the gasket to us.
Is the gasket installed correctly
Due to how they are manufactures, the gaskets come to us inside out, and that is how we ship them. Inside out means the notched side, which matches up with the lip in the lid, is on the inside (but needs to be on the outside). So the first step is to make sure the gasket is right-side out.
It is essential that the notch in the gasket site below the lip of the lid. Here are some useful graphics:


(Note that if you are having trouble getting the gasket installed, and it seems almost too big, try soaking it in some hot water to make it more pliable.)
Is the pressure cooker warped
If your pressure cooker is warped, the top can be out of round. This will cause steam to escape in certain spots around the rim of the lid.
Use a ruler or tape measure to measure across the top of the pressure cooker pot as close to across the center as you can. Measure in a few different spots. Each measurement should be exactly the same. If it is off, even by as little as 1/8 of an inch, your pressure cooker is warped and likely won’t seal well.
Note that as silicone ages, it swells. Old gaskets can sometimes work on a warped pressure cooker while a new one won’t. Your old gasket might be hiding the problem that isn’t apparent until you try a new gasket.
Is the gasket defective
Closely inspect the parts of the gasket that come into contact with the lid. Are there some injection molding artifacts hanging off of it? If so, try to gently pull them off. Are there any divots in the gasket? If so, this is a defect and could cause leaking. Let us know and we will replace it.
Has the latch metal bent?
The lid has a metal hook piece at the front underside of the handle. If this metal has gotten bent outward, it won’t apply enough downward pressure on the lid and thus the gasket. This could cause leaking. These pictures show this latch metal:

If you press the two handles together and the leak stops, this could be the problem. We’ve never tried it, but presumably you can try to bend it back down so the lid sits tighter when latched.
None of the above is true but it still leaks
If it is correctly positioned, your pressure cooker is not warped, and the gasket is not defective, there are still a couple of things you can try.
The first is to apply a thin coat of vegetable oil to the gasket before you put it in the lid. Oil will cause the gasket to swell slightly.
Second, you can try some silicone lubricant, like this type from Amazon.com.
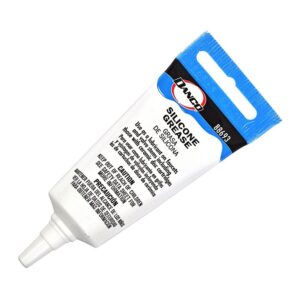
The product listing does seem to indicate that this lubricant is food grade.
Reader Don has the following suggestion:
I found some stuff that I use in one of my hobbies that makes cleaning the copper bottoms of pans effortless and it lasts for a long time see it here.
I used it by accident when I was cleaning my minerals and when I moved the pan away to get more room i was almost blinded when I lifted it off the counter in my shop.
2 things if you try this 1) use lots of cold water to rinse, if you think it’s enough do it 5 times more! 2) after you do this barkeepers friend is all my wife ever uses to keep “her”pans clean
The claim that it will never tarnish again is an interesting one. We’ve ordered some to see how well it works.
We’ve tried on several occasions to fix a warped skillet, with little success. However, we recently came across an article that talked about heating and pounding out a warped pan.
The technique is to heat them up, put a 2×4 long enough to go from edge to edge of the pan on to the crowned side, and beat the heck out of it — all over it’s entire length, while revolving it so the entire pan surface gets its share of whacking.
If the pan is warped so the crown is on the outside, you have to rest the lip of the pan on a flat surface, so that the handle doesn’t touch the surface; a stair step is good. If the pan is warped so the crown is inside, you have to cut the 2×4 to fit — as closely as you can but without making a big deal out of it.
Just keep reheating the pan and keep on whacking ’til you get bored. The flattening will hold longer if you do both the inside and outside, but you can get most of the goodness if you only flattened the crowned side.
If anyone tries this, please let us know if it works.
